How to Customize a WordPress Theme in 2 Easy Methods

Customizing a WordPress themes is a key step in creating a unique and professional website that reflects your brand. With the rapid evolution of WordPress in 2026, both beginners and experienced users can now personalize best WordPress themes more efficiently than ever. Whether you’re building a marketing site, agency page, or portfolio, the right customization can enhance user experience, improve engagement, and boost conversions. In this guide, we’ll walk you through step-by-step instructions on how to customize a WordPress theme using two reliable methods: the built-in Theme Customizer and the powerful Elementor page builder.
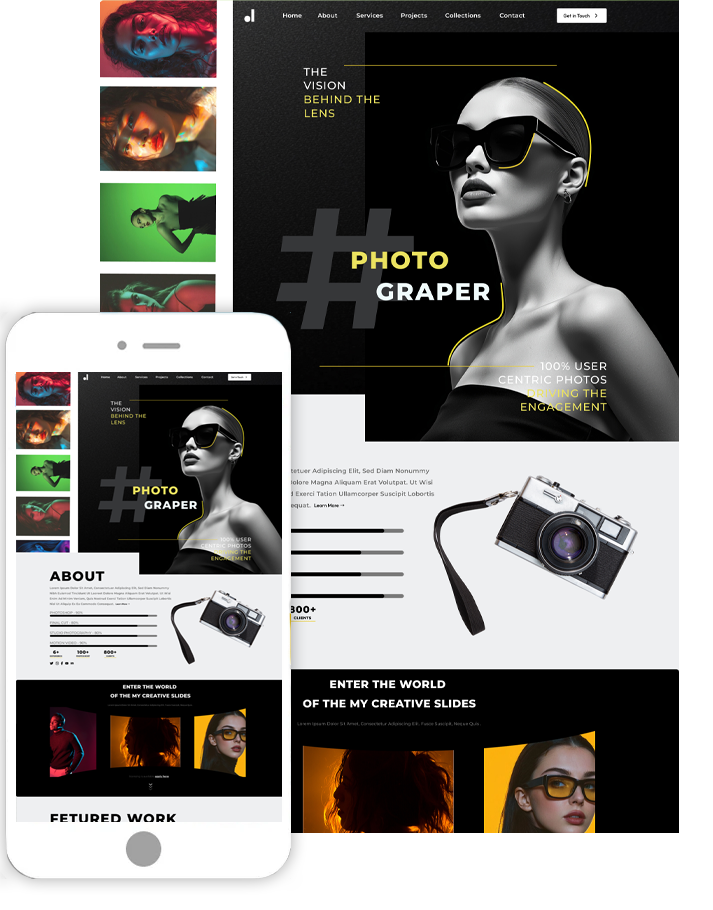
For this blog, we are using the Marketing WordPress Theme by Themes Pride, a versatile theme designed for modern marketing and business websites. By following these methods, you can confidently tailor your website’s design, layout, and functionality to match your brand identity.
Things to Do Before Customizing Your Theme
Before making any changes, it is essential to follow a few important steps to ensure a smooth, safe, and efficient customization process. Proper preparation not only protects your website from errors but also helps you work more confidently while making design or functionality changes.
-
Back Up Your Site: Always create a complete backup of your WordPress Website Security Check , including files and database, before starting any customization. This ensures that if anything goes wrong, you can quickly restore your site to its previous state without losing important data or design elements.
-
Use a Staging Environment: A staging site is a copy of your live website where you can test changes safely. Perform all customizations on the staging site first to avoid downtime, broken layouts, or negative user experience on your live site.
-
Choose a Quality Theme: Your customization flexibility depends on your theme. Using well-coded themes like Astra or GeneratePress ensures better compatibility with plugins and modern customization tools.
-
Keep Your Theme and Plugins Updated: Always update your theme and plugins before making changes. Updates fix bugs, improve security, and ensure compatibility with the latest WordPress version.
-
Use a Child Theme for Advanced Changes: If you plan to edit theme files directly, use a child theme. This prevents your changes from being overwritten when the parent theme updates.
-
Plan Your Customization in Advance: Before starting, outline what changes you want to make, such as layout, colors, or features. This saves time and helps maintain consistency throughout your website.
- Test Changes Regularly: After making each change, test your website on different devices and browsers to ensure everything works correctly and looks consistent.
Two Effective Methods to Customize a WordPress Theme
Method 1: Using the Theme Customizer
Let’s begin by exploring the first method using the Theme Customizer to make quick and easy design changes.
Step 1: Log in to Your WordPress Dashboard
To begin customizing, log in to your WordPress admin panel by entering your credentials. Once inside, you will see the dashboard where all theme and content settings are managed. In this guide, we are using the Marketing WordPress Theme by Themes Pride, which is designed for digital agencies and marketing websites with built-in customization options and flexible layouts.

This step is essential when learning how to customize a WordPress theme, as it gives you access to all customization tools. Explore sections like Dashboard > Updates, Appearance > Themes, and Appearance > Customize to understand where changes are made. Make sure your theme is activated before proceeding. Familiarizing yourself with the dashboard ensures a smooth customization process and helps you avoid mistakes while editing your site design.
Step 2: Open the Customizer
Navigate to Appearance > Customize to open the Theme Customizer for the Marketing WordPress Theme. This interface provides a live preview of your website, allowing you to make changes and see results instantly. The theme includes multiple customization options such as colors, typography, header styles, and layout settings, making it easy to personalize your site.
This step is crucial in understanding how to customize a WordPress theme because it allows safe editing without affecting your live website until you publish changes. Inside the customizer, you’ll find structured sections like Appearance > Customize > Site Identity, Colors, and Menus. The live preview feature ensures that every modification is visible in real time, helping you design your website confidently.
Step 3: Edit Site Identity

Go to Appearance > Customize > Site Identity to update your branding elements. In the Marketing WordPress Theme, this section allows you to upload your logo, edit your site title, tagline, and add a favicon. These elements define your brand identity and are visible across your website.
Choose a high-quality logo that aligns with your business niche, especially if you're building a marketing or agency website. The theme supports professional layouts, so maintaining consistent branding enhances credibility. You can preview how your logo appears in the header before publishing. Properly setting your site identity ensures your website looks polished and trustworthy to visitors, making a strong first impression.
Step 4: Customize Colors and Typography

Navigate to Appearance > Customize > Colors and Typography to adjust your site’s visual appearance. The Marketing WordPress Theme provides flexible color palettes and font options that help you match your brand style.
This step plays a key role in how to customize a WordPress theme, as consistent design improves user experience and engagement. Choose colors that reflect your brand and ensure readability across all sections. Similarly, select fonts that are professional and easy to read. Avoid overusing multiple styles, as this can make your website look cluttered. The theme’s customization options allow you to preview changes instantly, helping you achieve a balanced and visually appealing design
Step 5: Modify Layout and Menus

To structure your website, go to Appearance > Customize > Menus and Homepage Settings. The Marketing WordPress Theme includes pre-built sections like services, portfolio, testimonials, and pricing, which you can organize through menus.
Create navigation menus and assign them to header or footer locations. You can also choose whether your homepage displays posts or a static page. A well-structured layout improves user navigation and keeps visitors engaged. Use drag-and-drop functionality to reorder menu items and ensure important pages are easily accessible. Proper layout customization helps you present your content effectively and improves overall usability.
Step 6: Add Custom CSS (Optional)
For advanced styling, go to Appearance > Customize > Additional CSS. This section allows you to apply custom design changes beyond the default options provided by the theme.
If you want deeper control over styling, this step is important in how to customize a WordPress theme. You can adjust spacing, colors, or hide specific elements using CSS. The Marketing WordPress Theme supports customization-friendly structure, making it easier to implement small design tweaks. Always test your code using the live preview to ensure everything works correctly. This approach keeps your customizations safe during theme updates.
Step 7: Preview and Publish
After making all changes, review your website in the customizer preview. Check different sections like homepage, menus, and content layout to ensure everything looks consistent.
Finally, click Appearance > Customize > Publish to make your changes live. This step completes the customization process and ensures your website reflects your design preferences. Regular updates and improvements will help keep your site modern and engaging.
Method 2. Using Elementor
Now, we’ll look at how to customize your WordPress theme using Elementor.
Step 1: Install and Activate Elementor

To start, go to Plugins > Add New > Search “Elementor” > Install Now > Activate. Elementor is a powerful drag-and-drop builder that works seamlessly with the Marketing WordPress Theme, allowing you to design pages visually without writing code. This is the first step in understanding how to customize a WordPress theme using modern tools. Once activated, Elementor integrates into your dashboard and adds an “Edit with Elementor” option on pages. Ensure your theme is compatible and updated for the best performance.
Installing Elementor gives you complete control over layout design, making it easier to modify sections like banners, services, and call-to-action areas. This setup forms the foundation for building a fully customized and professional marketing website efficiently.
Step 2: Open the Homepage with Elementor

Navigate to Pages > All Pages > Home > Edit with Elementor to start editing the homepage of the Marketing WordPress Theme. This page already includes structured sections such as hero banners, services, testimonials, and pricing blocks. Once Elementor loads, you’ll see a live preview on the right and widgets on the left panel. You can click any section to edit its content directly.
The interface is intuitive and allows real-time editing without switching between preview and backend. This makes it easy to experiment with layouts and quickly update your content. You can also use the navigator panel to move between sections smoothly. Working on the homepage ensures that your main layout reflects your brand and provides a strong first impression to visitors.
Step 3: Use the Pre-Designed Marketing Layout
In this step, we will use the pre-designed homepage layout from the Marketing WordPress Theme, which includes ready-made sections like services, portfolio, testimonials, and pricing. This approach simplifies how to customize a WordPress theme, as you don’t need to build layouts from scratch. Instead, you can focus on editing existing elements to match your content and branding. Click on any section and replace demo text, images, and icons with your own.
This layout is designed for marketing and business websites, ensuring a professional structure. Using a pre-built design also helps maintain consistency across your pages. It saves time and allows you to launch your website faster while still achieving a polished and customized look.
Step 4: Customize Sections and Widgets

To modify content, click on any element and access Edit with Elementor > Section/Widget Settings. You can update headings, images, buttons, and icons directly from the editor panel. Elementor allows you to drag and drop widgets, making it easy to rearrange sections or add new ones. This flexibility is a key part of how to customize a WordPress theme, as it gives you full control over your design. You can duplicate sections, delete unnecessary elements, or create new layouts based on your needs. Each widget includes customization options, allowing you to fine-tune content and structure.
This step helps you personalize your website while maintaining a clean and organized layout that enhances user experience.
Step 5: Style Your Website Design

To enhance the visual appeal, go to Edit with Elementor > Style > Advanced for each section or widget. Here, you can adjust colors, fonts, spacing, and backgrounds to match your brand identity. The Marketing WordPress Theme works well with Elementor’s styling features, allowing detailed customization. You can also apply global styles to maintain consistency across your website. Adjust margins and padding carefully to ensure a balanced layout. Adding subtle animations or hover effects can improve engagement without overwhelming the design. Focus on keeping your layout clean and professional.
Proper styling ensures your website looks modern and visually appealing, which helps build trust and encourages visitors to explore your content further.
Step 6: Optimize for Mobile Devices
Switch to Edit with Elementor > Responsive Mode > Mobile/Tablet View to ensure your design looks perfect on all devices. This step is essential in how to customize a WordPress theme, as mobile responsiveness directly affects user experience and search rankings. Elementor allows you to customize layouts specifically for different screen sizes. You can resize text, adjust spacing, and hide certain elements for better mobile usability. Always preview your design in both mobile and tablet views before publishing.
A responsive website ensures that visitors can easily navigate your content regardless of the device they use. Taking time to optimize mobile design improves performance and keeps users engaged.
Step 7: Save and Publish Your Changes
Once your customization is complete, click Edit with Elementor > Publish or Update to make your changes live. Before publishing, review your entire page to ensure all sections are aligned properly and links are working. You can also use the preview option to see how your page appears to visitors.
This final step completes how to customize a WordPress theme using Elementor. If needed, save your work as a draft and make further adjustments later. Publishing ensures your updated design is visible to your audience. Regularly updating your website helps maintain a fresh and professional appearance, keeping visitors engaged and improving overall performance.
Wrapping Up
Customizing your WordPress website in 2026 has never been easier. Using either the Theme Customizer or Elementor, you can create a fully personalized and visually appealing website without compromising performance. The Marketing WordPress Theme provides a solid foundation with flexible layouts, pre-designed sections, and compatibility with modern tools, making it ideal for businesses and agencies. Remember to back up your site, test changes on a staging environment, and plan your customizations in advance to avoid errors.
By following these methods, you can efficiently update colors, typography, layouts, and content while maintaining a professional and cohesive design. Whether you prefer quick edits through the Customizer or full drag-and-drop control with Elementor, this guide on how to customize a WordPress theme ensures your website reflects your brand’s identity and delivers a seamless user experience.
Frequently Asked Questions (FAQs)
1. Do I need coding skills to customize a WordPress theme?
No. With the Theme Customizer, you can make basic changes like colors, layouts, and logos. Elementor provides drag-and-drop functionality, letting you design complex pages without coding.
2. Can I use the Marketing WordPress Theme with Elementor?
Yes, the Marketing WordPress Theme is fully compatible with Elementor, allowing you to use pre-designed templates and advanced layout controls to customize your site.
3. Is it necessary to create a backup before customizing a theme?
Absolutely. Backing up your website ensures you can restore your site if any customization causes errors or conflicts.
4. Should I use a child theme for customizations?
Yes. Using a child theme is recommended if you plan to modify theme files directly, as it protects your changes during theme updates.
5. How do I ensure my website looks good on mobile devices?
Both the Theme Customizer and Elementor allow you to preview and adjust layouts for mobile and tablet screens, ensuring responsive and consistent design across all devices.
Search
Blog Categories
WordPress Theme Bundle

Bestseller Themes