How to Create a Fitness Website on WordPress in 2026

Building a strong online presence is essential for every fitness brand in 2026. Whether you are a personal trainer, gym owner, yoga instructor, or fitness coach, a professional website helps you attract clients and grow faster. If you want to create a fitness website, WordPress makes the process simple and flexible. It offers powerful themes, drag-and-drop page builders, and fitness plugins that save time. You can easily design a gym website, launch an online training platform, sell workout programs, or promote fitness classes.
WordPress also supports membership features, booking systems, and payment gateways. This helps you manage clients smoothly. With the right fitness website design, you can showcase transformation stories, add workout schedules, publish health blogs, and optimize WordPress themes for SEO. Mobile-friendly layouts and fast loading speed improve user experience. In this guide, you will learn step-by-step how to set up hosting, install WordPress, choose the best fitness theme, and customise your site. By the end, you will be ready to launch a modern fitness business website that stands out in a competitive market.
Why use WordPress for a Fitness Website?
If you want to create a fitness website, WordPress is arguably the most powerful tool at your disposal. It balances professional functionality with user-friendly controls, making it the industry standard for personal trainers and gym owners.
Here is why it’s the top choice for your fitness brand:
- Ease of Use: You don’t need to be a coder. The intuitive dashboard allows you to update class schedules or post workout tips with just a few clicks.
- Flexibility and Customization: Your brand is unique. WordPress lets you customize every detail, from your colour palette to your layout, so your site matches your gym's energy.
- SEO-Friendly Structure: WordPress is built for visibility. Its clean code helps you rank higher on Google, making it easier for local clients to find your services.
- Thousands of Themes and Plugins: Access specialized tools effortlessly. You can add booking systems, calorie calculators, or membership portals using dedicated fitness plugins.
- Cost-Effective Solution: Save your budget for equipment. The core software is free, and affordable hosting options make it much cheaper than hiring a custom developer.
Plan your Fitness Website
Planning is the most critical step before you create a fitness website. A well-thought-out strategy ensures your platform serves your business needs rather than just looking pretty. Start by narrowing your focus to save time and resources.
- Define Your Niche: Specificity is your best friend in the fitness industry. You must define your fitness niche to stand out in a crowded market. Decide if your site will cater to a local gym, a yoga studio, specialized personal training, or scalable online coaching.
- Know Your Audience: Once you have a niche, you must identify your target audience. Are you reaching out to busy professionals, post-partum mothers, or elite athletes? Understanding their age, fitness level, and pain points allows you to speak their language.
- Establish Objectives: Every successful site needs a purpose. You need to set clear goals to measure your success over time. Determine if your primary focus is lead generation for local clients, selling monthly memberships, or driving digital course sales.
- Map Out Your Content: The final stage of preparation is to plan essential pages. At a minimum, you need a high-converting Homepage, a detailed "About Me" section, and a clear Service page.
Step-by-step guide on How to Create a Fitness Website
Here is a step-by-step guide on how to create a fitness website in a simple and beginner-friendly way:
Step 1: Get a Domain and Hosting

Securing your domain and hosting is the first critical step to create a fitness website. Think of the domain as your digital street address and hosting as the actual land where your site lives. Getting these right from the start saves you massive headaches later.
How to Choose a Brandable Domain Name
Your domain name should be short, memorable, and easy to type. Avoid using hyphens or numbers, as these often lead to typos.
For a fitness brand, try to include keywords that reflect your niche, such as "yoga," "strength," or "coach," but keep them broad enough to allow your business to grow. A .com extension is still the gold standard for credibility and recall.
Choose reliable hosting
Next, choose reliable web hosting. When looking for a host, don't just hunt for the lowest price. You need three non-negotiables:
- Speed: A slow site kills your search engine rankings and frustrates users.
- Security: Ensure they provide a free SSL certificate to protect client data.
- Support: Look for 24/7 expert help for when things (inevitably) get technical.
Why Bluehost is Highly Recommended
Bluehost is widely considered a top-tier choice, especially for beginners, because WordPress officially recommends it. It offers an all-in-one package that includes a free domain for the first year and an automated SSL certificate.
To purchase, simply go to their site, select a "Shared Hosting" plan, and enter your chosen domain name.
Fill in your account details, choose your term length, and complete the checkout. It’s straightforward and takes less than five minutes.
Step 2: Install WordPress

Once you have your hosting secured, the next move is actually to set up the software. This is the stage where you officially create a fitness website by transforming your empty hosting space into a functional platform.
Installing WordPress in One Click
The best part about using Bluehost is the seamless integration. Once your purchase is complete, you don’t need to be a coder or a technical expert to get started. You can install WordPress with a single click directly from your Bluehost dashboard.
The system is designed to do the heavy lifting for you. It automatically handles the complex database setup and software installation behind the scenes. This process eliminates the need for manual file transfers or configuration. Within moments, Bluehost hands you the keys to your new site, allowing you to log in to your WordPress admin area immediately.
Step 3: Choosing the Best Fitness WordPress Theme

Selecting the right theme is a pivotal moment when you decide to create a fitness website. These WordPress themes for small business dictates how your brand looks and, more importantly, how it functions for your clients. A well-chosen theme ensures your content is accessible, professional, and easy to manage.
Mobile-First and Responsive Design
Modern fitness enthusiasts often browse on the go. A mobile-first design ensures your site looks perfect on smartphones before scaling up to desktops. Responsive design complements this by automatically adjusting your layout to fit any screen size.
Fast-Loading Themes
Speed is a critical factor for user retention. Fast-loading themes prevent visitors from leaving due to laggy pages. They use lightweight code and optimized elements to ensure quick interaction. Since search engines favor fast sites, a speedy theme also helps improve your rankings.
Customization and Page Builder Compatibility
Every fitness brand has a unique identity. High-quality themes offer extensive customization options to change colors, fonts, and layouts without coding. Compatibility with popular page builders like Elementor or WPBakery makes this even easier. You can simply drag and drop elements to design your perfect homepage.
Why Choose Themes Pride?
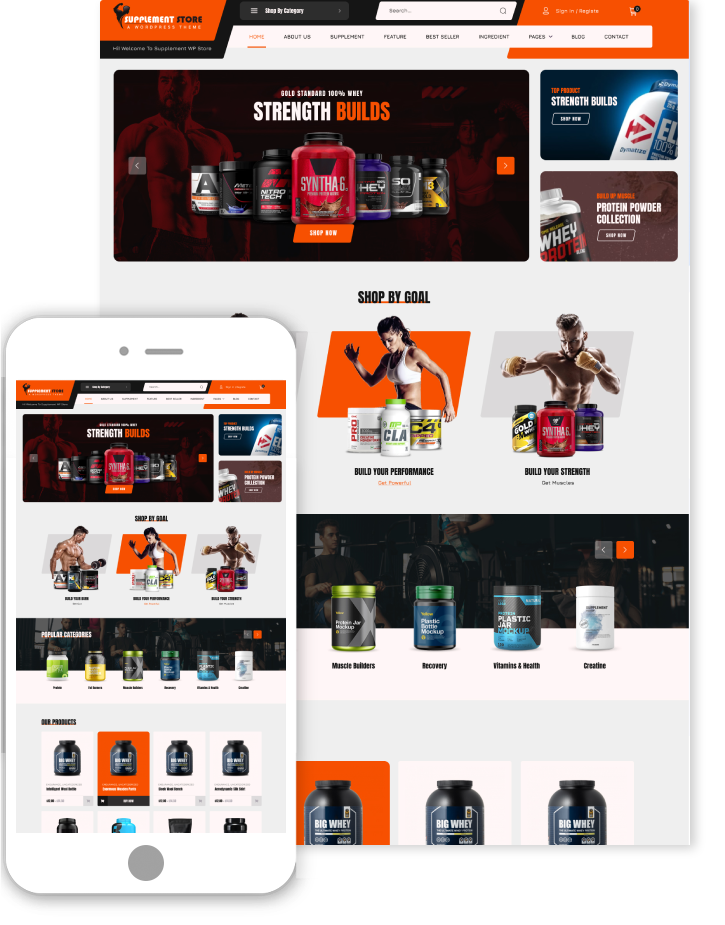
Themes Pride is widely recognized as one of the best theme providers in the industry. They specialize in creating niche-specific designs that are both aesthetically pleasing and technically robust. Their commitment to clean code and user-friendly interfaces makes them a top choice for professionals.
Their Fitness Supplement WordPress Theme is truly one of a kind. It is specifically tailored for health and wellness businesses focusing on nutritional products. The theme features a fluid layout, unlimited color options, and full WooCommerce integration. It provides a polished platform to showcase supplements with professional clarity.
How to install a WordPress Theme?

Installing the Fitness Supplement WordPress Theme from Themespride is a straightforward process once you have your ZIP file ready.
Phase 1: Prepare Your Theme File
When you purchase or download the theme from Themespride, you will usually receive a "bundle" file.
- Locate the Installable File: Do not upload the entire folder you downloaded. Unzip the initial download on your computer first.
- Identify the Correct ZIP: Look for a file specifically named fitness-supplement.zip (or similar). This is the file you will upload to WordPress.
Phase 2: Upload via WordPress Dashboard
Once you have the correct ZIP file, log in to your WordPress admin panel.
- Navigate to Appearance: On the left-hand sidebar, hover over Appearance and click on Themes.
- Add New: Click the Add New Theme button at the top of the page.
- Upload Theme: Click the Upload Theme button at the top.
- Choose File: Click "Choose File" and select the fitness-supplement.zip file from your computer.
- Install Now: Click the Install Now button.
- After the installation is complete, you will see a success message.
- Activate: Click the Activate link to make the theme live on your site.
Step 4: Installing Essential Plugins

Now that your site is live, you need to add functionality. To create a Fitness Website that actually performs, you must install specific tools called plugins. Think of these as "apps" for your website that handle everything from security to sales.
Essential Plugins for Your Fitness Site
- SEO Plugin: Best SEO WP Plugins help your site show up on Google. Use this to optimize your blog posts and pages for fitness-related keywords.
- Security Plugin: Protects your hard work. It acts as a firewall to block hackers and prevent malware.
- Backup Plugin: Your safety net. It automatically saves copies of your site so you can restore it if anything goes wrong.
- Booking and Scheduling Plugin: Vital for trainers. This allows clients to book sessions or join classes directly through your calendar.
- Membership Plugin: Restrict your best content. Use this to create a "members-only" area for exclusive workout videos or meal plans.
- WooCommerce for Selling Programs: The gold standard for e-commerce. Use this to sell digital training guides, physical equipment, or supplement lines.
How to Install a WordPress Plugin?
Installing a plugin is straightforward and takes less than a minute. Follow these steps:
- Log In: Access your WordPress Dashboard.
- Navigate to Plugins: On the left-hand sidebar, hover over Plugins and click Add New.
- Search: Use the search bar in the top right corner. Type in the name of the plugin (e.g., "Yoast SEO" or "WooCommerce").
- Install: Once you find the correct plugin, click the Install Now button.
- Activate: After the installation finishes, the button will change to Activate. Click it to turn the plugin on.
Step 5: Create Important Pages

With your plugins ready, it is time to build your site’s structure. To Create a Fitness Website that builds trust and converts visitors into clients, you need these foundational pages.
Must-Have Pages for Your Fitness Site
- Home Page: This is your digital storefront. It should clearly state who you help and include a strong call-to-action (CTA).
- About Page: Share your fitness journey and credentials. People buy from trainers they relate to and trust.
- Services / Programs Page: List exactly what you offer. Detail your 1-on-1 coaching, group classes, or digital workout plans.
- Pricing Page: Be transparent about your costs. Clear pricing helps filter for serious leads and saves time.
- Testimonials Page: Provide social proof. Display "before and after" photos and success stories from happy clients.
- Blog Page: Share free value. Post-workout tips and nutrition advice to improve your SEO and authority.
- Contact Page: Make it easy to reach you. Include a simple contact form, your email, and links to your social media.
How to Create a New Page in WordPress?
Building these pages is simple using the built-in editor:
- Open Pages: In your WordPress Dashboard, click on Pages in the left menu.
- Add New: Click the Add New Page button at the top.
- Add Title: Type the name of the page in the title block.
- Insert Content: Use "Blocks" to add text, images, or videos.
- Publish: Click the blue Publish button in the top right corner to make it live.
Step 6: Setting up Online Bookings and Payments

Automating your schedule and revenue is the final piece of the puzzle. To create a Fitness Website that runs while you sleep, you must transition from manual invoicing to a streamlined digital system.
Key Components for Automation
- Integrating Booking System: Connect your calendar to your site. This allows clients to see your real-time availability and book sessions without back-and-forth emails.
- Accepting Payments Securely: Use trusted gateways like Stripe or PayPal. This ensures client data is encrypted and funds are deposited directly into your bank account.
- Setting up Memberships or Subscriptions: Create recurring revenue. Set up monthly billing for ongoing coaching or "all-access" passes to your video library.
How to Connect Payments and Bookings?
Most fitness websites use a combination of a booking plugin and a payment processor. Here is the general workflow:
- Select Your Gateway: Go to your plugin settings and select Payments.
- Link Your Account: Follow the prompts to "Connect" your Stripe or PayPal account. This usually requires a quick login to the provider.
- Create Your "Product": Define what you are selling. Is it a "60-Minute Personal Training" session or a "Monthly Yoga Membership"?
- Set the Price: Enter the amount and choose between a one-time payment or a recurring subscription.
- Sync the Calendar: Map your "Product" to your available hours so the booking only happens when you are free.
Step 7: Adding Content Marketing Strategy
Great content turns random visitors into loyal clients. To Create a Fitness Website that grows organically, you need a plan to share your expertise and build an audience.
- Starting a Fitness Blog: This is your home base for SEO. Regular posts tell Google your site is active and relevant.
- Writing Workout and Nutrition Articles: Answer common questions. Share "how-to" guides for exercises or simple meal prep ideas.
- Creating Lead Magnets: Offer a "freebie" in exchange for an email address. A 7-day fat-loss plan or a stretching guide works perfectly.
- Email Marketing Integration: Connect your site to a service like Mailchimp or ConvertKit. This lets you send newsletters and automated follow-ups to your leads.
How to Create and Share Your First Post?
Don't overthink it. Focus on being helpful.
- Pick a Topic: Think of a question a client asked you this week.
- Go to Posts: In your WordPress Dashboard, click Posts > Add New.
- Write Your Title: Use clear, catchy titles like "5 Minutes to Better Mobility."
- Add Your Content: Write 500–800 words of actionable advice. Use bullet points for readability.
- Insert a Lead Magnet: At the end of the post, add a button or form that says, "Get my free workout guide here!"
- Hit Publish: Share the link on your social media channels.
Conclusion
You now have the complete roadmap to create a fitness website that serves as your 24/7 business partner. By choosing WordPress, you gain total control over your brand and client data. Focus on making your site mobile-friendly, as most clients book sessions on the go. Ensure your booking and payment systems are seamless to reduce friction.
A successful site is never truly finished; it evolves with your expertise. Use your blog to share modern workout trends and nutrition science. High-quality lead magnets will help you grow a valuable email list for long-term revenue. Prioritize site speed and security to maintain professional credibility. Your website is the heart of your fitness empire and the first point of contact for new leads. Take that first step today to secure your place in the fitness industry. Your future clients are already searching for the guidance only you can provide.
Frequently Asked Questions (FAQs)
1. Do I need coding skills to create a fitness website on WordPress?
No. You do not need coding knowledge. WordPress offers drag-and-drop page builders. You can design pages easily. Most themes and plugins are beginner-friendly.
2. Can I sell fitness programs online?
Yes. You can use WooCommerce to sell workout plans, diet charts, and merchandise. You can also offer memberships and subscriptions.
3. How do I get clients through my fitness website?
Use SEO and content marketing. Publish workout and nutrition articles regularly. Promote your website on social media. Collect emails and run campaigns.
4. Is it important to make the website mobile-friendly?
Yes. Most users browse on mobile devices. A responsive design improves user experience and conversions.
Search
Blog Categories
WordPress Theme Bundle

Bestseller Themes